
Maybe this sounds a little… ambitious? Unnecessary? Overachieving?
But if you can make pancakes, you can make tortillas.
And really, this was always the way of it, women making their tortillas with their hands, until at some point, it wasn’t.
So why bother?
We modern women are consumers of packaged, stacked, uniformly round, shelf-stable and suspiciously soft tortillas. At least I was, until it occurred to me to read the ingredients… “palm and or soybean oil, calcium propionate, fumaric acid, mono- and diglycerides, sodium metabisulphite”… just to name a few.
So I took a shot at the homemade thing.
But there were so many steps, rest times, types of grains, the added effort and dirty dishes, is it really worth it? (…what is metabisulphite?)
I’m here to say, it’s not so hard. In fact, it’s not hard at all. And they’re actually really, really good!
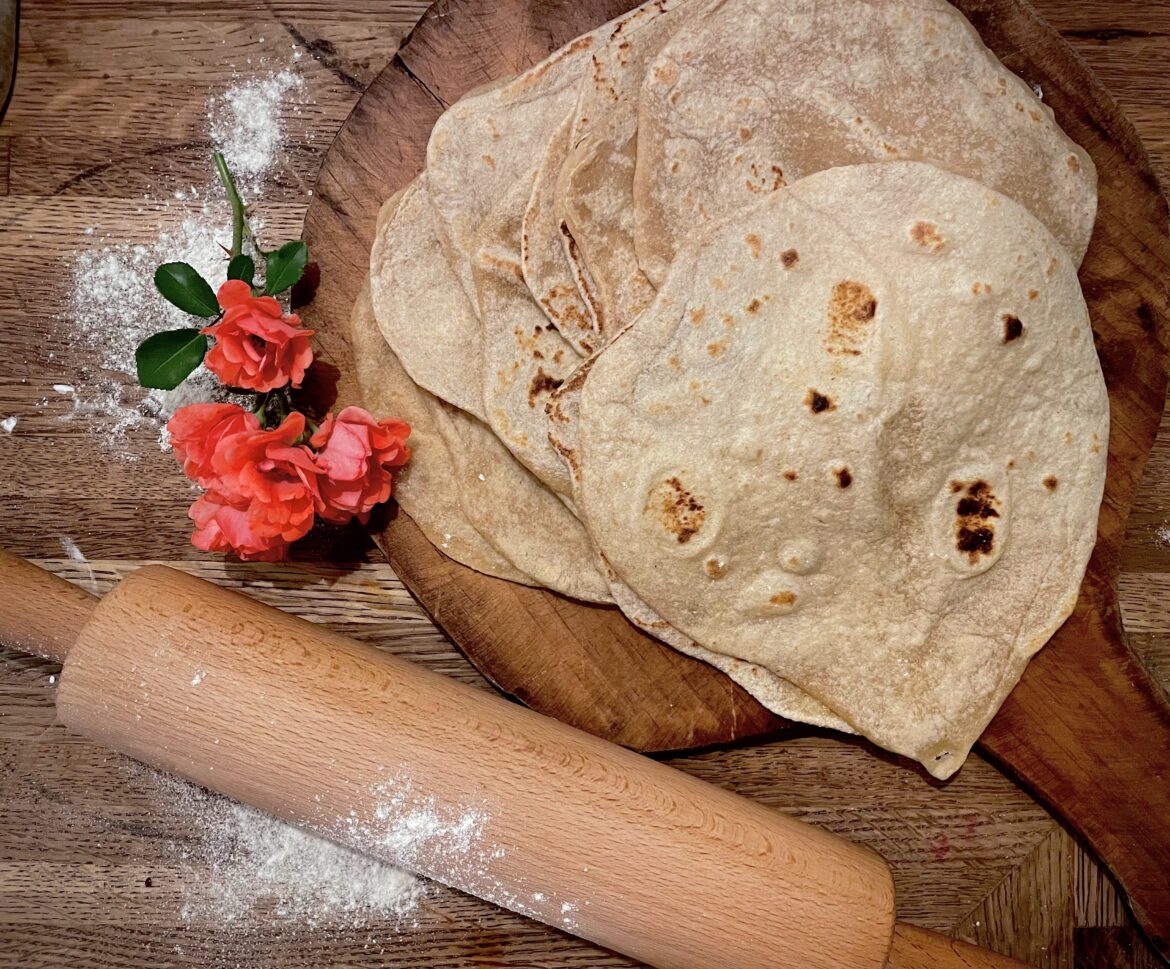
These whole wheat tortillas are soft and bendy and smell like warm olive oil and a baker’s oven. Even the irregularities are a welcomed aesthetic against the monotony of uniformity.
In fact, since making the switch to these whole wheat tortillas, I once reverted to the store-bought kind when I needed to throw together a dish for a party. I was surprised by the apathetic blandness those store-bought tortillas contributed; a wet blanket at my fiesta.
I won’t lie, at first it’s a little tricky as you get the technique down, but if you persevere through a few tortilla-making sessions, you’ll be as savvy as a flap jack flipper.
A note about the wheat
I use hard white wheat for my tortillas. You’ll want a hard wheat, AKA a high protein wheat, because wheat protein is gluten, and gluten means the dough is a stretchy and elastic and able to hold a bubble. And in tortillas, bubbles and stretchy are good things.
While this recipe does focus on gluten development (achieved through kneading the dough causing a “web” of structure to form), it does not depend on leveling. There are no specific fermenting, proofing or rising times to constrain your schedule. The only time requiring element is the *rest*, which I’ll talk about momentarily.
The How To
This recipe is my adaptation from Sue Becker’s as detailed in The Essential Home-Ground Flour Book.
Simply grind your wheat and add in the bit of salt and baking powder. In the standing mixer, add a cup of warm water and the olive oil. Now combine everything into the mixer and allow the dough to knead on low for for a minute or so, until a dough ball forms. Turn off the mixer and let the dough rest for a while, at least 10 minutes.


resting & soaking
“Resting” allows the flour to soak up all of the moisture, which makes all the difference when it comes to working with whole wheat dough. It becomes much more compliant. It’s the difference in toddler who’s had a nap and a drink and a toddler who hasn’t.
When your dough has rested for at least 10 minutes (or longer is just fine) and is feeling particularly amicable, turn the mixer on low again and let it spin for a few minutes or until the dough looks entirely smooth and consistent. It should seem elastic and soft and prefer to stick to itself in one large form rather than to the sides of the bowl.
If it’s too wet, feel free to throw little spoonfuls of flour in until it looks right. On the other hand, if the dough is too dry, that’s a bigger problem. A dry dough will make cantankerous little tortillas that are brittle and apt to crack. Make sure your dough is well hydrated.

Here mine is pillowy and stretchy while not sticking to the sides. I was able to pull it out of the bowl with little fuss.
Now for the fun part
On your biggest cutting board, or directly on your clean countertop, drizzle some olive. Rub a little oil on your hands and on to your rolling pin as well. (By the way this oil dispenser has been a real joy!)

Form a dough ball and then divide it in half. Press the halves down and divided them into 5-7 little pillows, as equally sized as possible.


If you’re using a griddle or a pan, you’ll want that nice and toasty before you slap down a tortilla, so go ahead and turn on the heat (about medium). I personally use my flat top range like a griddle, and it works great. No one has stopped me, so, I’m going to keep doing it.
Go ahead and set out a cooling rack to receive the hot tortillas as they come off the pan, stove, whatever.
Now you should have something of an assembly line set up: a staging area, the heat, and the cooling rack.
Now for those little pillows, we need them to be balls. You may notice that one side is stickier than the other, use that to your advantage. Fold the corners inward, on the sticky side so they stay, and continue to fold the outer part under itself again, until you have a pleasant little taunt dough ball. This should happen quickly, maybe 30 seconds each.
If they are unmanageably sticky, don’t be afraid to oil them down. It will just add to the flavor and there’s no need to punish yourself.


To form the tortillas, you’ll flatten with your fingers, and then roll out the tortilla, first one way, then another, and then pick it up and gently pull it until you’re satisfied with the thinness. Most importantly, make sure the thinness is consistent. It’s easy to end up with a sheer middle and fat edges, which leads to cracking centers in your tacos.


Lay it on the heat in whatever fashion you find works for you. Wait until it begins to bubble up and becomes more opaque than glossy and then flip! Wait until it begins to puff again, and it’s done. Move it to the rack and repeat.


I can typically get into a rhythm of rolling out the next tortilla while the previous one is on the stove, and then doing a swap out, and repeating.
And just like that, you’re done!
Now go make something really good with them, like shrimp tacos or cheesy enchiladas or black beans & rice chicken wraps.
And if there’s extra, make some Buñuelos!


Freshly Milled Whole Wheat Tortillas
35
minutes10
minutesThese freshly milled whole wheat tortillas are soft and bendy and smell like warm olive oil and a baker’s oven. Even the irregularities are a welcomed aesthetic against the monotony of uniformity.
Ingredients
1 cup warm water
1/4 cup olive oil (or avocado oil)
1/2 teaspoon salt
2 3/4 cups milled hard white wheat flour
1/2 teaspoon baking powder
Directions
- Mill hard white wheat berries until you have 2 3/4 cups of flour. Add in 1/2 tsp salt and 1/2 tsp baking powder and give it a quick stir.
- In the bowl of your standing mixer, add 1 cup of warm water and 1/4 cup of olive oil. Pour in the flour mixture and allow it to knead on low with the dough hook attachment for a minute or two.
- Turn off the mixer and allow dough to rest and soak, at least 10 minutes, longer is ok too.
- Knead again on low again for 2-3 minutes. The dough ball should become well formed, elastic and glossy. It should not be sticking to the sides of the bowl at this point.
- Pull the dough from the mixing bowl and form a dough ball with well oiled hands and set it on a large, clean, oiled work surface. You can leave this dough ball to rest while you do other things, or you can continue to step 6, There is no levain in this dough, so it is entirely flexible with regards to timing.
- Divide the dough ball in half, and then each half into about 5 similarly sized pillows. Let these rest a few minutes before shaping into balls.
- Once your dough balls are formed, clear a workspace for rolling out the tortillas. Drizzle olive oil on the area where you will be rolling. You can rub some on your hands and rolling pin as well. Don’t be afraid to reapply if needed later. Put a pan or griddle on the heat (or just use your glass top range if you have one) and let it get warmed up. Set out a cooling rack to receive hot tortillas.
- To roll, press your dough ball flat with your fingers, and then roll it out into a long oval with the rolling pin. Flip it 90 degrees and roll again to form more of a round shape. (The photos in the post above may be helpful). Be sure to apply pressure evenly and do not make the middle too thin or taper the edges too much. Overly thin areas will become papery and brittle.
- Pick up the flattened shape and gently pull and stretch it with your fingers or let it hang and stretch itself, like a pizza dough.
- Lay it flat onto the hot pan or stove top and do not move it. It will be stuck upon contact, and then it will quickly cook and become loose. When you see bubbles form and the skin of the dough become more matte than glossy, flip it over. Allow it to become slightly puffy and then flip it onto the cooling rack.
- Repeat the process until completed and serve immediately or cool and wrap tightly and freeze for future use.
Notes
- If your dough seems too dry, it’s ok to add water, and if it seems too wet and sticky, it’s ok to add flour, just add a little at the time and allow it to fully incorporate.
Once you get the hang of the process, you can easily multitask; shaping cooking and replacing tortillas simultaneously.
Be careful of the hot steam that puffs out of the bubbles!
Leave a Reply
You must be logged in to post a comment.